")


友情链接:
Contact us Chinese English Alibaba
DYLINK new technologyNational High-Tech Enterprise
Service Hotline0755 86120002


Service Hotline0755 86120002

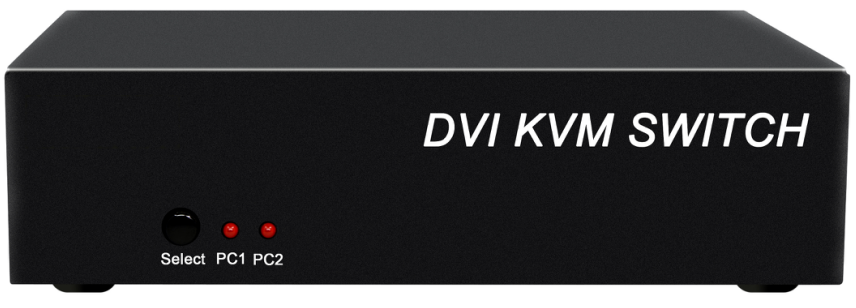
分类:DVI KVM switch
描述:
Product Description:DVI KVM multi-computer switch1.This system enables users to swiftly switch between 2, 4, or 8 computer hosts using a single USB keyboard, mouse, and DVI video interface, facilitating efficient multitasking.2.The DVIKVM switch supports HD 1920*1080P at 60Hz, delivering0755 86120002

Product Description:
DVI KVM multi-computer switch
1. This system enables users to swiftly switch between 2, 4, or 8 computer hosts using a single USB keyboard, mouse, and DVI video interface, facilitating efficient multitasking.
2. The DVIKVM switch supports HD 1920*1080P at 60Hz, delivering a wider display and an optimal work experience.
3. The DVI KVM switch supports seamless switching between 2, 4, or 8 computers, featuring a dual-port USB Hub. This enables rapid, seamless data transfer for USB keyboards and mice via KVM cables, while the USB Hub also grants each computer access to two additional USB2.0 peripherals.
4. The device is easy to install and use, requiring only cable insertion into its designated ports. No software configuration is needed, and compatibility issues are eliminated. It works seamlessly across multiple operating systems including Windows, Linux, and Mac.
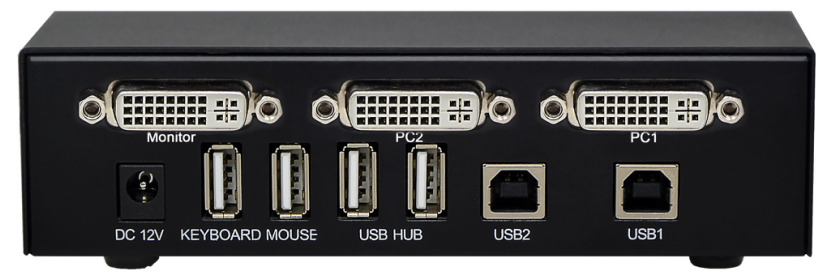
Product connection requirements
1. PC version: 2/4/8 DVI cables and 2/4/8 USB A/B cables.
2. User interface: a monitor with a DVI port; a USB keyboard, a USB mouse; two USB2.0 devices.
Product images
Product Features
1. Built-in 2-port USB Hub with full USB2.0 compatibility.
2. Two flexible switching modes: front panel buttons and keyboard hotkeys;
3. Supports HD resolution 1920 x 1080@60Hz;
4. The keyboard and mouse support port emulation and bypass functions, compatible with IBM, DELL, HP, and Double Fly Mouse/Keyboard.
5. Multi-platform support: Windows, Linux, and Mac
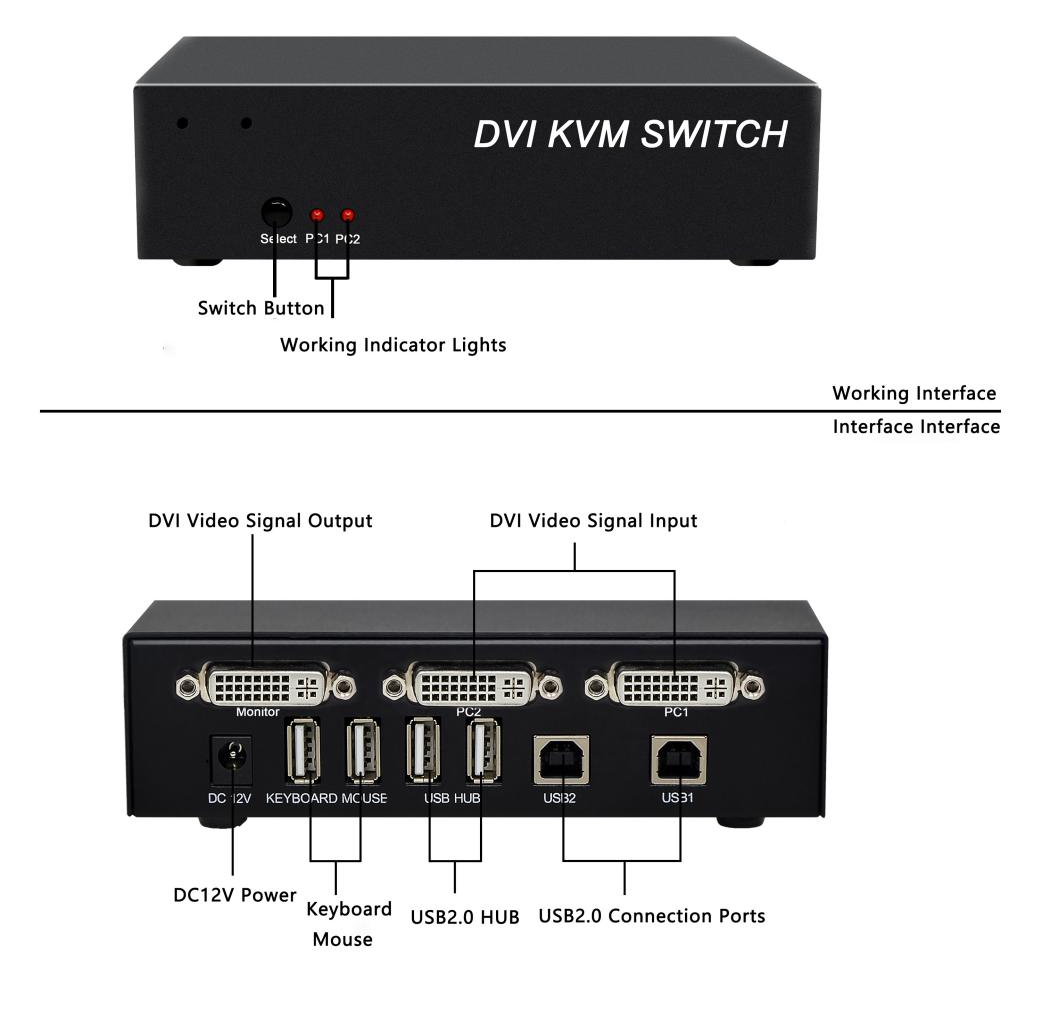
switching mode
There are two ways to switch: ① Switch through the buttons on the front panel. ② Switch using the keyboard hotkeys.
Button toggle
The front panel has 2, 4, or 8 buttons. Pressing a button switches to one of the 2, 4, or 8 ports.

To switch to port 1, 2, 3, 4, or 8, press and release the ScrollLock key, then press and release the ScrollLock key again, followed by pressing and releasing the numeric keys '1', '2', '3', '4', or '8', and finally press the Enter key.

To activate the automatic scanning switch, press and release the ScrollLock key, then press and release it again, followed by pressing and releasing the letter key's' or 'S', and finally pressing Enter. The switcher will then automatically alternate between the two ports at the preset time intervals.

To extend the automatic scanning interval, press and release the ScrollLock key, then press and release the ScrollLock key again, followed by pressing and releasing the letter key's' or 'S', and finally pressing Enter. The automatic scanning interval has seven preset durations: 10 seconds, 20 seconds, 30 seconds, 50 seconds, 100 seconds, 200 seconds, and 5 seconds, with the default set to 10 seconds.

Press and release the ScrollLock key, then press and release it again, followed by pressing and releasing the letter keys'd' or 'D', and finally pressing Enter to reduce the automatic scanning interval.
Interface Function
Packing List
Thank you for using our products. Before opening the packaging, please check the product packing list.
Product packing list:
√ SW2201D One
√ 12V/1A power adapter One
√ operating instruction a part
√ Warranty card certificate One copy each
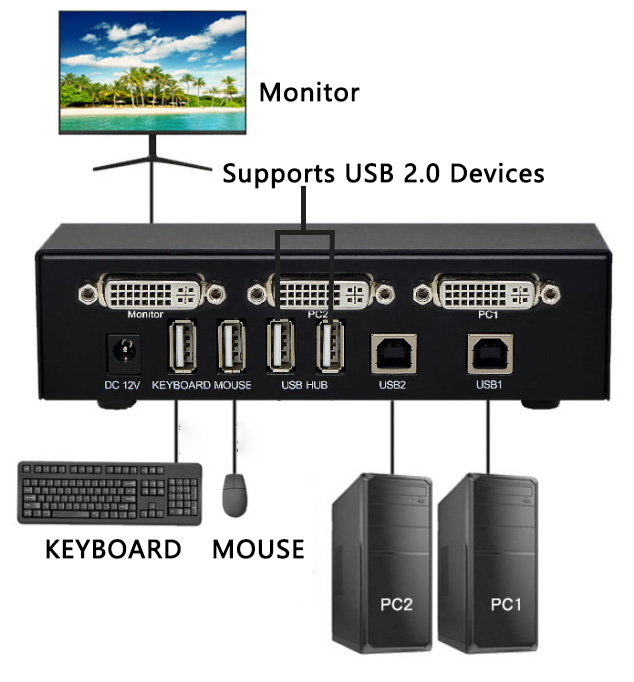
Topology diagram
Install
1. Turn off the power for the switch, DVI monitor, and all hosts。
2. Insert the USB keyboard and USB mouse into the ports labeled as keyboard and mouse on the switch. If needed, you can also connect two USB2.0 universal peripherals to the ports labeled as USB Hub, such as a USB flash drive or USB camera.。
3. Insert the DVI monitor into the switch port labeled "Monitor" and turn on the monitor power.。
4. Use a DVI cable to connect the DVI port on the switcher to the DVI port on the host.
5. Connect the switcher's USB port to the host's USB port using a USB cable.
6. Power on the switch。
7. Turn on all computer power and start。
Product Parameter
specifications | SW2201D(order goods) | SW2401D(order goods) | SW2801D |
Number of connected computers | 2 | 4 | 8 |
Computer connection port | 2xDVI female port; 2x USB Type B female port; | 4xDVIfemale port ;4x USB Type B female port | 8xDVIfemale port; 8x USB Type B female port; |
Client connection port | Keyboard and mouse2x USB Type A female port; 2xUSB2.0TypeAfemale port1xDVIfemale port; | Keyboard/mouse 2x USB Type A female ports; 2x USB2.0 Type A female ports; 1xDVI female port | eyboard/mouse 2x USB Type A female ports; 2x USB2.0 Type A female ports; 1xDVI female port |
Highest video resolution | 1920*1080@60Hz | 1920*1080@60Hz | 1920*1080@60Hz |
Panel key | 1 | 4 | 9 |
LED pilot lamp | 2 | 4 | 9 |
Port switching method | Keys and keyboard shortcuts; | Keys and keyboard shortcuts; | Keys and keyboard shortcuts;; |
source | DC12V/1A | DC12V/1A | DC12V/1A |
working temperature | -40 ~ +55°C | -40 ~ +55°C | -40 ~ +55°C |
size | 154mm X55mm X 40mm | 245mm X 90mm X 45mm | 440mm X150mm X 45mm |
 DYLINK new technology
 0755 86120002
 liyj@dayapc.com
 13316531915
 West 2nd Floor, Building B, No. 91, Ma Hom South Road, Ma Hom Community, Xili Street, Nanshan District, Shenzhen
  公众号二维码
公众号二维码
业务主管
业务经理
业务经理
业务经理
售后